The fall and winter holidays offer some of the best opportunities for campground celebrations. Light shows, train rides, and other themed attractions offer refreshing takes on the holiday season. So ditch the piles of presents and other obligations, and instead book your holiday vacation at the campground.
Here’s how to accomplish a fun and festive vibe at camp.
Table of Contents
- Holiday Decorating Tips
- Decorating Ideas for Thanksgiving & Winter Holidays
- Holiday Recipe Ingredient List
- Grilled and Roasted Dry-Brined Turkey Breast Recipe
- Cast Iron Skillet Potatoes With Caramelized Onions Recipe
- Creamy Green Beans and Mushrooms Recipe
- Roasted Delicata Squash Salad Recipe
- Dutch Oven Apple Crisp Recipe
- Red Wine Sangria Recipe
Holiday Decorating Tips
Choose a Theme
For Thanksgiving, do you want to go in a direction that’s centered around the food or go with a general cozy fall vibe with flannel and candles? For Christmas, do you want traditional decorations in red and green, or do you prefer a more neutral color palette?
Small Items, Big Impact
Consider buying less expensive decorations that you don’t mind donating after the holidays are over. In this case, shop at stores like Dollar Tree, Target, or Walmart.
Decorate Vertically
This keeps your countertops clear. Hang items around the slides, on doors, or from your lights. It’s tempting to go overboard buying cute decor that sits on your counters, but it will quickly leave you with little to no usable space.
Buy Ahead of Time
If you want to save on holiday decorations, shop right after the holiday for next year as items are often discounted to at least 50 percent.
Make It Fun
Join the kids on a scavenger hunt to find natural objects that you can use for decorations.

Insider Tip
Garlands are versatile decorations that you can use for different holidays, and they don’t take up much storage space. For Halloween, hang pumpkins on your garland; for Thanksgiving, swap the pumpkins for leaves and pinecones; and for Christmas, add fairy lights and ribbons.
Decorating Ideas for Thanksgiving
- Replace your kitchen towels, throw pillows, or blankets.
- Use fall leaves and collect acorns and display them in a mason jar.
- Research local farm stands in the area and buy a small stack of hay. Use it to decorate outside your RV together with a few pumpkins or gourds.
Decorating Ideas for Winter Holidays
- Buy a miniature tree and decorate it with your favorite ornaments.
- Lights, lights, and more lights! Whether you choose icicle lights on the roof or awning, or twinkling lights around the entire RV, you have endless options to choose from.
- Buy gifts online and look to give experiences.
- If you have stockings, hang them on your island countertop or fireplace mantle.

Insider Tip
Use small, clear Command Hooks on the outside of your RV and leave them up year-round so you can easily string your lights again the following year.
Holiday Recipe Ingredient List
Cooking a big holiday meal in an RV has one obvious obstacle: space. But even though meals in an RV call for simplicity, you don’t have to sacrifice traditional holiday flavors. With that in mind, we created five delicious, seasonal, RV-friendly courses that you’ll have no problem cooking in any tiny kitchen space.

Insider Tip
Many grocery stores sell pre-made Thanksgiving dishes that include everything from appetizers to turkey or ham, plus desserts. Check with stores near the campground you’re staying at for Thanksgiving and pre-order before the deadline.
What You’ll Need
Cookware
- • Cast iron skillet
- • Grill or oven
- • Dutch oven
- • Stove or induction plate
Pantry Items
- • Boneless turkey breast
- • Potatoes
- • Green beans
- • Mushrooms
- • Delicata squash
- • Apples
- • Oranges
- • Blackberries
- • Dried cranberries
- • Onion
- • Shallots
- • Salted pepitas
- • French fried onion
- • Olive oil
- • Salt
- • Pepper
- • Sugar
- • Brown sugar
- • Corn starch
- • Rolled oats
- • Flour
- • Poultry seasoning
- • Apple pie spice
- • Dijon mustard
- • Honey or syrup
- • Apple cider vinegar
- • Heavy cream
- • Grated parmesan
- • Butter
- • Dry red wine
- • Orange liqueur
- • Seltzer water or ginger ale
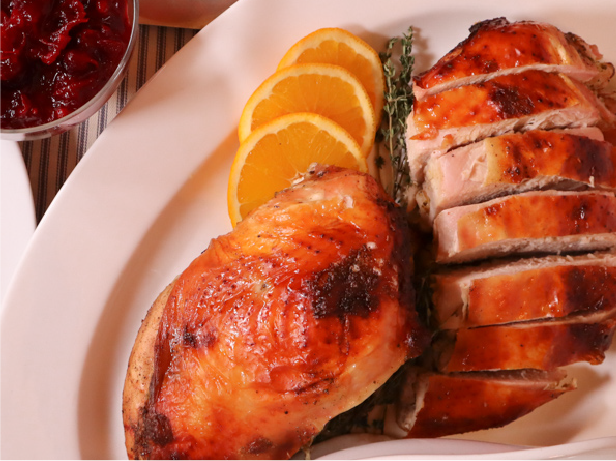
Grilled or Roasted Dry-Brined Turkey Breast
Choose a boneless turkey breast to save space in your refrigerator or cooler. RVers with smaller ovens will
have no problem roasting this cut of poultry. And for those who have access to a portable grill (or campfire with a grate), this turkey breast can be grilled instead of roasted. Finally, if you can’t find a boneless whole turkey breast, see if your butcher can debone a bone-in turkey breast for you. As a last resort, deboning it yourself is easy, and you will end up with some bones for making turkey soup.
Ingredients
- • 5 to 7 pounds of boneless turkey breast
- • 2 tablespoons kosher salt
- • 2 tablespoons brown sugar
- • 1 tablespoon poultry seasoning
- • Zest of 1 orange

Instructions
- Mix the kosher salt, brown sugar, poultry seasoning, and orange zest together in a small bowl.
- Rub the mixture over the boneless turkey breast on both the skin side and the meat side.
- Place into a sealable storage bag or airtight container. Let the herb-rubbed turkey sit for at least 6 hours and up to 24 hours.
- Once you’re ready to cook, either roast or grill the turkey.
- Roast the turkey in the oven on a roasting pan or on a rimmed sheet pan at 375 degrees Fahrenheit for about an hour. The turkey is done when a probe thermometer reads 165 degrees Fahrenheit.
- If you’re using a covered grill, place the bird meat side down over the heat and cover. Allow the grill to reach 375 F and cook until the internal temperature of the bird reaches 165 F.
- If you’re grilling over a fire, grill over hot coals with the skin side down. Let cook until the skin is browned, then flip and cook until the turkey registers 165 F with a probe thermometer.
- Rest the cooked turkey for about 15 minutes and then slice and serve.
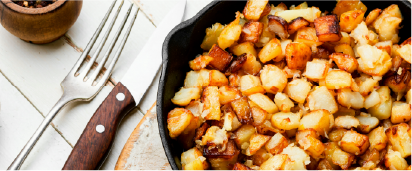
Cast Iron Skillet Potatoes With Caramelized Onions
What’s a holiday meal without potatoes? These crispy skillet potatoes with caramelized onions are
simple but big on flavor.

Ingredients
Caramelized Onions
- • 1 tablespoon olive oil
- • ½ large onion, sliced thinly
- • 1 shallot, thinly sliced
- • Kosher salt, to taste
Crispy Potatoes
- • 4 russet potatoes
- • 1 teaspoon seasoned salt
- • 2 tablespoons olive oil
Instructions
- Heat olive oil over medium-low heat in a skillet. Add the onion, shallots, and a pinch of salt. Cook slowly for about 30 minutes until the onions are softened and turn golden brown. Set caramelized onions aside.
- Put the potatoes in a medium pot and cover with water. Bring the water to a boil and simmer until the potatoes are fork-tender, about 15 to 20 minutes. Remove from the pot, run under cool water, and dry. Cut the cooled potatoes into half-inch chunks.
- Heat olive oil in a large cast iron skillet over medium-high heat. Add the potatoes and sprinkle with seasoned salt. Cook, stirring occasionally until the potatoes are crispy on all sides. Taste and add more seasoned salt if desired.
- Top potatoes with caramelized onions and serve straight from the skillet.
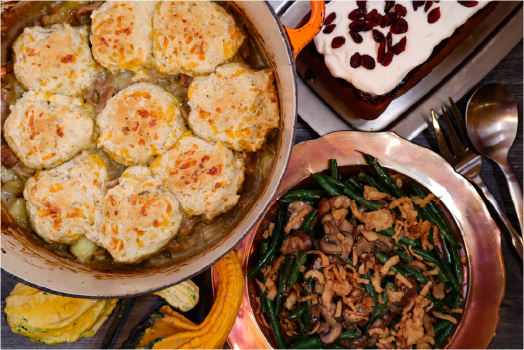
Creamy Green Beans and Mushrooms
Inspired by a classic Thanksgiving side dish—green bean casserole—this can be cooked on the stovetop
so it doesn’t take up oven space. This dish might even be better than the original because the lighter
cream sauce lets the flavors of the green beans and mushrooms shine. But don’t worry, it still requires a
hefty topping of crunchy onions.
Ingredients
- • 1 pound green beans, trimmed
- • 1 tablespoon olive oil
- • 15 button mushrooms, sliced
- • 2 tablespoons shallots, minced
- • ½ cup heavy cream
- • 2 tablespoons grated parmesan cheese
- • ½ cup crispy French fried onions
- • Salt and pepper, to taste

Instructions
- Bring a large pot of water to a boil. Add the green beans and cook just until tender. Drain and rinse with cold water.
- In a large skillet, heat the olive oil over medium heat. Add the mushrooms and a pinch of salt. Cook until the mushrooms start to brown. This will take about 5 to 7 minutes. Add the shallots and cook until they are soft and translucent.
- Add the heavy cream and grated parmesan cheese. Stir and let the cream reduce slightly. Add the green beans and toss with the mushrooms and sauce. Add a pinch of salt and pepper.
- Transfer to a serving platter and top with crispy French fried onions.
Roasted Delicata Squash Salad
This flavorful squash side dish is delicious at room temperature, so you can make this salad ahead of time and let it sit while your turkey cooks. Delicata squash is also a small and easy squash to prep. You don’t even have to remove the peel since it’s edible, and makes for a pretty presentation.
Ingredients
- • 2 delicata squash
- • ½ tablespoon olive oil
- • Salt and black pepper, to taste
- • 1 tablespoon shallots, minced
- • 1 teaspoon Dijon mustard
- • 1 tablespoon maple syrup (or honey)
- • 1 tablespoons apple cider vinegar
- • 2 tablespoons olive oil
- • 1 teaspoon kosher salt
- • 1 teaspoon black pepper
- • ½ cup dried cranberries
- • ¼ cup roasted and salted pepitas

Instructions
- Cut the delicata squash in half lengthwise. Remove the pulp and seeds with a spoon and discard. Cut into quarter-to-half-inch slices. Place on a baking sheet. Drizzle with olive oil and sprinkle with salt and black pepper.
- Roast in the oven at 375 degrees Fahrenheit for about 35 to 45 minutes. Flip the squash every 15 minutes. The squash will be done when it’s fork-tender and slightly browned.
- While the squash is roasting, make the vinaigrette by whisking together the shallots, Dijon mustard, maple syrup, apple cider vinegar, olive oil, salt, and pepper in a small bowl.
- When the squash is cooked, transfer it to a large bowl. Toss with the vinaigrette, cranberries, and pepitas.
- Serve hot or at room temperature.
Dutch Oven Apple Crisp
This apple crisp bakes nicely in a cast iron Dutch oven, and the crispy topping might even be tastier than pie crust. Bake it while you’re eating dinner and you’ll end up with a warm, comforting dessert that’s a perfect ending to a holiday at the campground.
Ingredients
- • 1 cup rolled oats
- • 1 cup flour
- • 1 cup brown sugar
- • ½ teaspoon kosher salt
- • 1 stick butter, cut into small cubes
- • 8 apples, cored, peeled, and diced into ½-inch chunks
- • ¼ cup sugar
- • 2 tablespoons maple syrup (optional)
- • ½ tablespoon apple pie spice
- • 1 tablespoon corn starch

Instructions
- In a medium bowl, combine the oats, flour, brown sugar, and salt. Add the butter and use your fingers to knead the butter into the dry ingredients, forming a crumbly dough.
- Place the apples in a 12-inch cast iron Dutch oven. Add the sugar, maple syrup, apple pie spice, and cornstarch. Toss to combine with the apples. Crumble the oat topping over the apple mixture evenly.
- To cook, light 24 charcoal briquettes and let them heat up; they will turn ashy when ready. Find a clear, safe spot on the ground to lay eight coals down in an even circular pattern slightly smaller than. If your Dutch oven has feet, place it over the coals; if your Dutch oven doesn’t have feet, find a way to elevate it so it’s sitting close to, but not on top of, the coals. You can use rocks, a grilling grate, or a cast iron trivet. Place the lid on the Dutch oven and add the remaining 16 coals on top, spread evenly across the lid. Cook for 45 minutes, rotating the bottom and top of your cast iron Dutch oven about 30 degrees every 15 minutes.
Red Wine Sangria
Red wine sangria requires time to marinate, which makes it the perfect cocktail to make ahead in batches.
Makes: 30 ounces, about 4 to 6 cocktails.
Ingredients
- • 750 milliliters dry red wine (cabernet sauvignon works well)
- • 4 ounces orange liqueur
- • 1 apple, diced
- • 1 orange, diced
- • 4 ounces blackberries
- • Seltzer or ginger ale, to serve
Instructions
Mix together wine (choose a quality but not expensive wine for sangria), orange liqueur, apple, orange, and blackberries in a half-gallon mason jar or sealable pitcher. Let sit overnight to meld the flavors.
To serve, add ice to an 8- to 12-ounce glass and add the premixed sangria to the glass along with fruit from the bottom of the pitcher. Finish with 1 to 2 ounces of seltzer—or if you like a sweeter sangria, use
ginger ale.

Make It Virgin
Use cranberry juice, pomegranate juice, grape juice, or another juice of choice instead of wine. You can also use sparkling water (flavored or unflavored) as your base.

